Step 1: Install Your Printer the Right Way
- Plug your USB receipt printer into the computer (CASHIER-PC) and turn it on.
- We need to use a simple, universal driver. Press the
Windows Key + R, typecontrol printers, and hit Enter. - Click Add a printer.
- Windows will look for your printer and likely fail. Click The printer that I want isn’t listed.
- Select Add a local printer or network printer with manual settings. Click Next.
- Important: Choose
USB001(orUSB002) from the “Use an existing port” list. This is the port your printer is actually on. Click Next. - Now, click Windows Update. Wait for the list to load.
- On the left, click Generic. On the right, click Generic / Text Only. Click Next.
- Finish the installation. Name the printer
POS-Receipt.
Why this driver? It doesn’t change the data. It just passes the raw ESC/POS commands from your software directly to the printer.
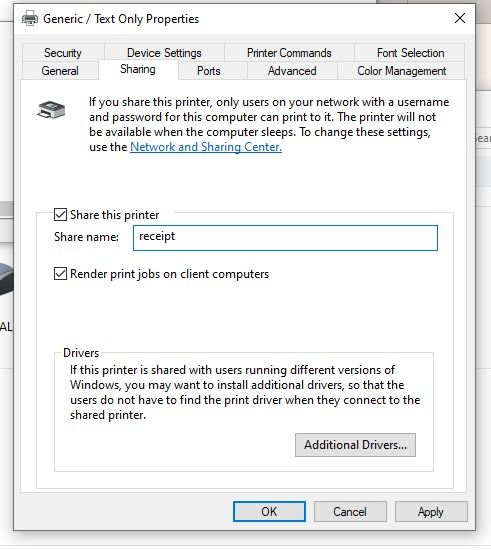
Step 2: Share the Printer
We are going to share the printer on the computer itself. This lets us “trick” Windows into mapping it to LPT1.
- Right-click on your new POS-Receipt printer and select Printer properties.
- Go to the Sharing tab.
- Check the box next to Share this printer.
- Give it a simple, short share name. Use all lowercase letters and no spaces.
Name it:receipt - Click Apply and then OK.
Step 3: The Magic Command – Map LPT1 to the Printer
Now we tell Windows that every time something is sent to the LPT1 port, it should be redirected to our shared printer.
- Click the Windows Start menu, type
cmd. - Right-click on Command Prompt and select Run as administrator. This is very important.
- Copy and paste the following command into the window and press Enter:
NET USE LPT1 /DELETE
(You might see an error message. This is fine. It just makes sure we start fresh).
4. Now, copy and paste this command and press Enter:
NET USE LPT1 \\127.0.0.1\receipt /PERSISTENT:YES
You should see the message: “The command completed successfully.”
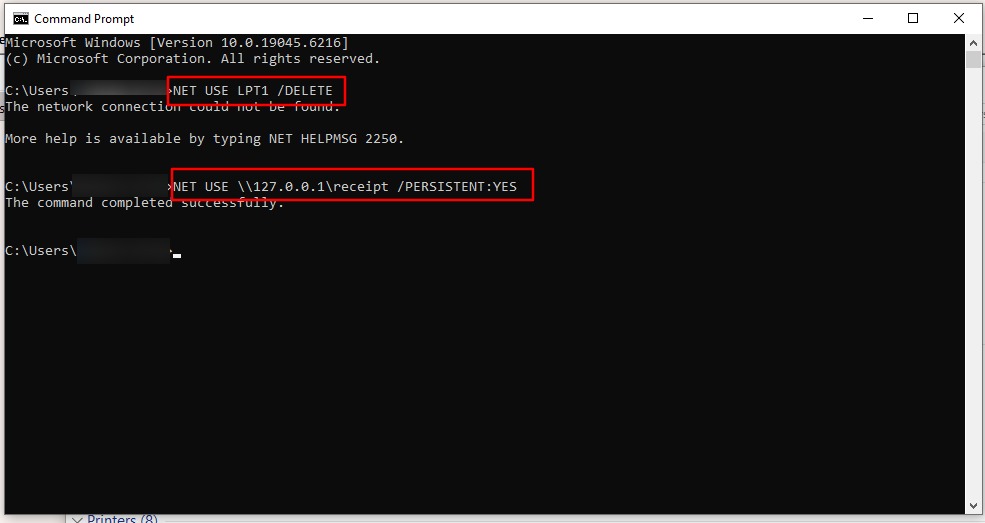
What does this command mean?
NET USE LPT1: Tells Windows to use the LPT1 port.\\127.0.0.1: This is a secret code that always means “this computer.”\receipt: This is the name of the shared printer we made./PERSISTENT:YES: Means “remember this forever, even after I reboot.”
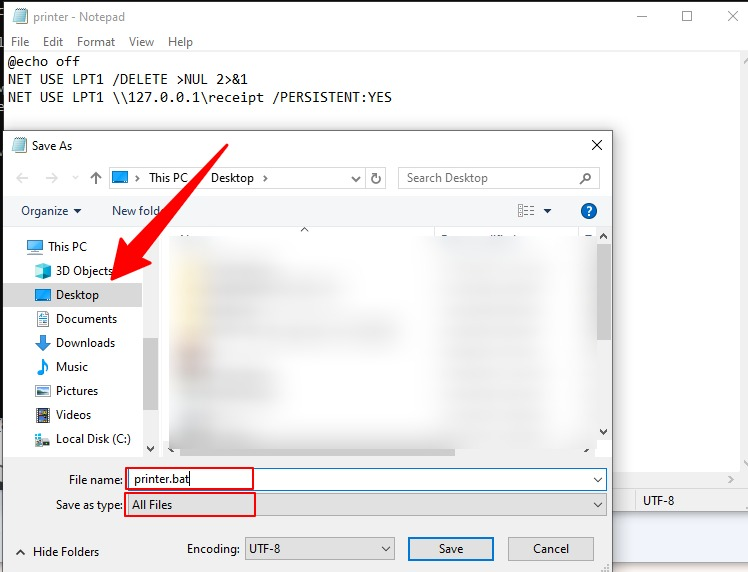
Step 4: Make It Automatic
The mapping we just did might forget itself when the computer restarts. We will create a simple file that runs the command every time the computer turns on.
- Open Notepad.
- Copy and paste the exact text below into the Notepad window:
@echo off
NET USE LPT1 /DELETE >NUL 2>&1
NET USE LPT1 \\127.0.0.1\receipt /PERSISTENT:YES
- Click File > Save As.
- Navigate to your Desktop.
- In the “Save as type” box, select All Files (.).
- In the “File name” box, type: printer.bat
- Click Save.
How to Add the Batch File to Startup
- Now, we need to put a copy of this file in the special Startup folder so it runs by itself on every restart.
- Press the
Windows Key + R, typeshell:startup, and press Enter. A folder will open. - Do not close this folder. Look at your Desktop and find the MapPrinter.bat file.
- Click on the file, hold down the mouse button, and drag it directly into the Startup folder that you opened in step 1.
- Let go of the mouse button to copy the file into the folder.
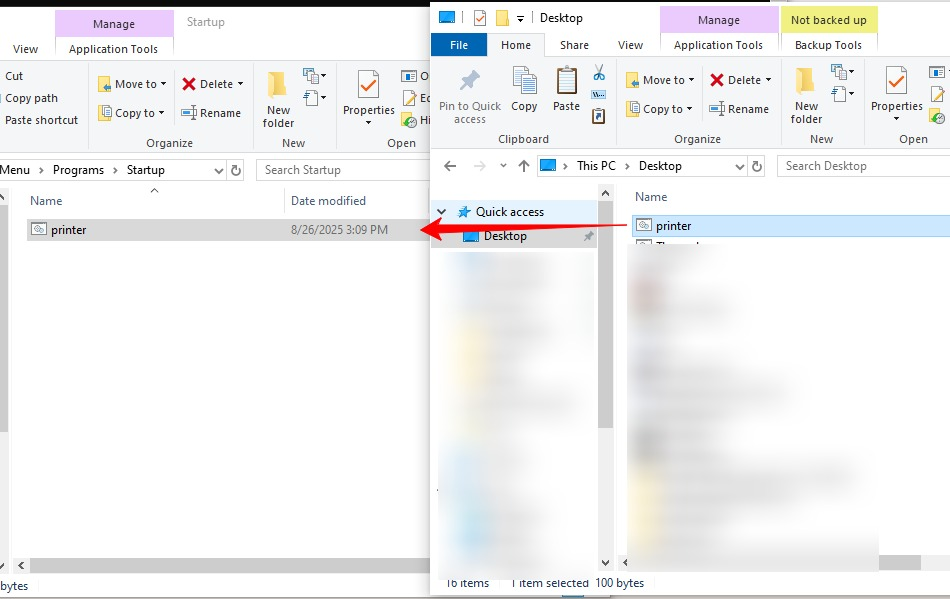
You are done! Now, every time someone logs into the computer, it will automatically connect the LPT1 port to your USB printer.
Step 5: Test It!
Let’s make sure it works.
- Open a Command Prompt (you don’t need admin rights for this test).
- Type this command and press Enter:
echo Hello, PAWAPOS! This is a test. > LPT1
- Your receipt printer should immediately print the message.
If it works, your PawaPos printout will also work.
Troubleshooting Common Issues
Problem: “System error 5 has occurred. Access is denied.”
- Solution: You did not run Command Prompt as an administrator. Close it and try again. Right-click on Command Prompt and select “Run as administrator”.
Problem: “The network name cannot be found.”
- Solution 1: Check the spelling of your share name. It must be exactly
receipt. - Solution 2: The printer is not shared. Go back to Step 2 and make sure the “Share this printer” box is checked.
Problem: Test page prints but POS software does not.
- Solution: Your POS software might be trying to use a different LPT port. Check its settings to confirm it is set to
LPT1:. Some very old software may need the colon (LPT1:).
Problem: “There are no more endpoints available from the endpoint mapper.”
- Solution: The Windows Print Spooler service has crashed. Restart it:
- Press
Win + R, typeservices.msc, and press Enter. - Find the Print Spooler service.
- Right-click on it and select Restart.
- Press
Problem: Mapping is lost after reboot.
- Solution: The batch file is not in the correct Startup folder. Press
Win + R, typeshell:startup, and make sure theMapPrinter.batfile is in the folder that opens.
Need More Ports? (LPT2, LPT3, etc.)
If your setup requires multiple receipt printers (e.g., one for kitchen, one for customer), you can map them to LPT2, LPT3, etc.
- For each physical printer, repeat Step 1 and Step 2. Give each shared printer a unique name (e.g.,
receipt1,kitchen). - To map them, use the same
NET USEcommand, but change the port and share name.
Example Commands:
NET USE LPT2 \\127.0.0.1\receipt1 /PERSISTENT:YES
NET USE LPT3 \\127.0.0.1\kitchen /PERSISTENT:YES
- Update your
printer.batfile to include all the mappings:
@echo off
NET USE LPT1 /DELETE >NUL 2>&1
NET USE LPT2 /DELETE >NUL 2>&1
NET USE LPT3 /DELETE >NUL 2>&1
NET USE LPT1 \\127.0.0.1\receipt /PERSISTENT:YES
NET USE LPT2 \\127.0.0.1\receipt1 /PERSISTENT:YES
NET USE LPT3 \\127.0.0.1\kitchen /PERSISTENT:YES